
I happen to be a college student and since I have a very
limited space in my tiny room there I had to master a specific type of
decoration in order to make myself feel as “at home” as possible. I call these
“low budget creative decorations for limited spaces”.
The good things about college habitation are the following:
- It`s yours, meaning you can make it as personal as you want to.
- It`s temporary, you can go a little crazy and experiment.
- It`s a challenge, face it. Make it as pretty and as functional as possible.
My first project was a shelf. I really wanted to put a vase
with flowers somewhere and my room was certainly not big enough for any other
table than the desk I already had there.
I searched around and got some inspiration off of Pinterest.
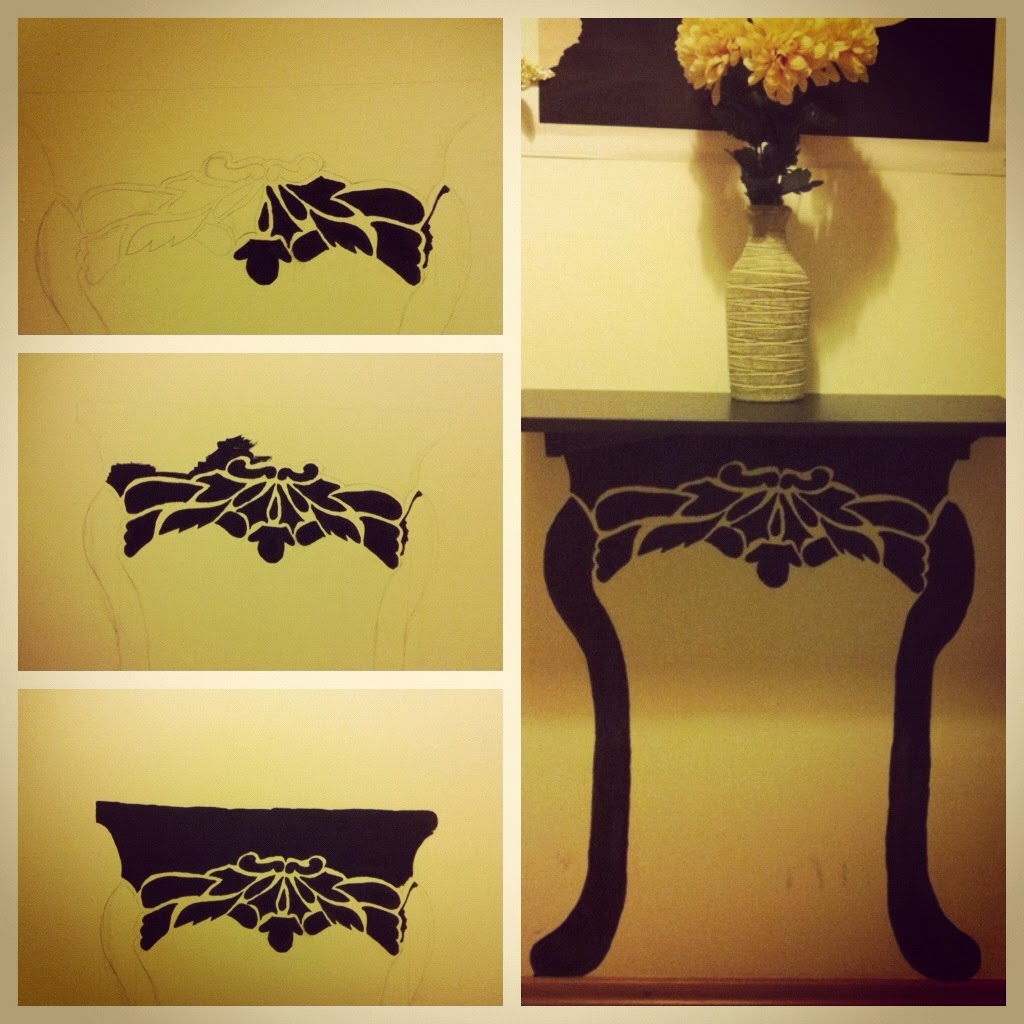
This is my final product:

Budget:
Shelf – Ikea: $ 2
2 shelf holders – Ikea: $ 1.25 each
Tempera paint – 2 tubes (7ml each) - $ 2 total
Brushes – 1 thin and 1 thick – around $ 4 total
Other things you will need:
Pencil
Ruler
Screws and a screwdriver (ideally a man to do that part but
it`s not too hard)
These are very detailed instructions:
1. Put the shelf on the wall where you want it and make marks for how wide it was. Then take it off
1. Put the shelf on the wall where you want it and make marks for how wide it was. Then take it off
2. With a pencil draw the body of the table. Make sure to leave yourself big
enough space in between the pattern, trust me, you will cross your pencil line
and the last thing you want is to have the pattern connect where it`s not
supposed to. (note that eraser works as wonderful on the wall as it does on paper)
3. After you`re finished with the body, draw the legs. You want to make
sure they are both equally as far from the center. I used a simple ruler for
that. It doesn`t have to be totally precise.
4. Take the thin brush
and go around the edges.
5. Fill the insides with paint
with the thick brush. (I kept switching cause I was curious how it was gonna look like, so I lined the edges of the pattern and filled it in right away)
6. Let it dry for about 2 hours
7. Screw the shelf
holders in and finally – put the shelf on top of them. I didn`t feel like more screws so I just used a two sided duct tape (and I am not ashamed, lol)
Voila – here`s your little personal table/shelf. I couldn`t tell you how many people asked me about it and had a hard time believing it was that simple!